Store Transfers
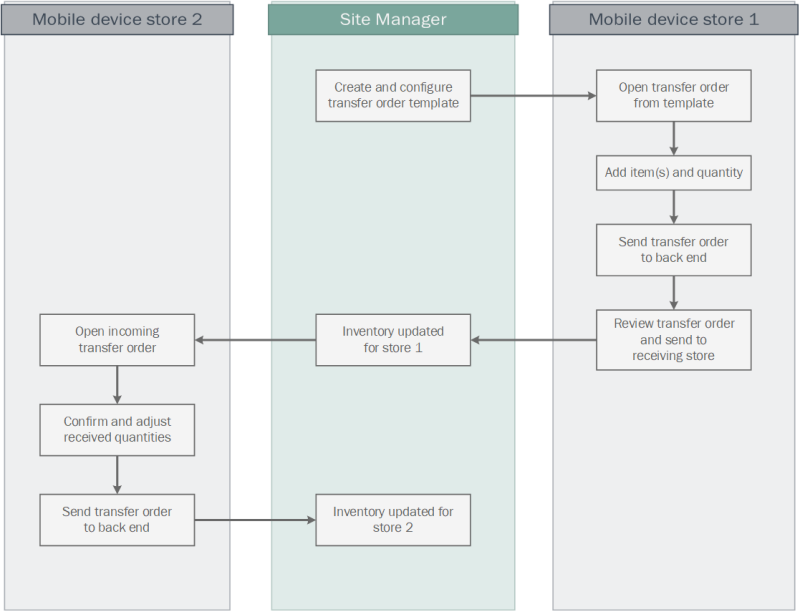
The LS Commerce Mobile Inventory app can be used to transfer inventory between stores.
Workflow

Preparation
To be able to create a transfer order from the Inventory app you need to create a Transfer order template in Site Manager.
It is a good idea to create one template for transfers to each store. To do this you create an empty transfer order template and under Transfer order tab in the template set the store that should receive the inventory as the default receiving store and there you can also select if you want to auto populate the receiving quantity or not. This template can now be used in the app for all stores to create transfer orders to the default receiving store.
You can also add different sets of items to the templates if you are constantly transferring the same items together between stores.

If a default receiving store is not set on the template it will not show up in the Mobile Inventory app.
Create transfer order from template

In the layout provided in the LS Commerce data pack you find the Store transfers menu at the bottom of the Inventory menu. It includes the operations Sending and Receiving.
If you have created your own button setup you need to add a buttons with the store transfer operations.
To create a transfer order from the LS Commerce Mobile Inventory app:
- From Store Transfer menu select Create transfer order.
- A list with all available templates is displayed.
- Select the template you want to use.
- Template is opened and if it contains items they are loaded but if not an empty document is added.
- Now edit quantities and add items until you have all the items you want to transfer. You can exit the template at this point and re-enter it later to finish editing. Changes will be saved. Once the order is like you want it proceed to the next section to send it.

Sending the transfer order from here will create a new transfer order in Site Manager with status 'New'.
Send a transfer order
To send a transfer order from the LS Commerce Mobile Inventory app:
- The LS Commerce Mobile Inventory app is connected as a terminal in the sending store.
- Go to Store transfers
- Select the Sending option
- Select which store to send the stock to. That is the store you set as default receiving store in the template you used.
- Here you will see all transfer orders that have been created from the sending store to the receiving store. Some might be filled in already, but others might be empty and can be filled in the app.

If you get the message "No document found", you first need to create the transfer order in the Site Manager.
You also need to be sure to create the transfer order from the correct sending store and select the correct receiving store.
- Add items to the transfer order by searching by ID or description and selecting the quantity to be transferred.
- You can save the transfer order at anytime and continue working with it later on.
- When all items have been added to the transfer order and the transfer has left the building, you press the SEND button. Then the transfer order status will be set to 'Sent' and the transfer can be received by the receiving store.
How to receive a transfer order
To receive the transfer order in the LS Commerce Mobile Inventory app:
- The LS Commerce Mobile Inventory app is connected as a terminal in the receiving store. You can change the store on the app through Utilities > Change store.
- Go to Store transfers.
- Select the Receive orders option from the menu.
- Select the store you are receiving stock from.
- Here you will see all transfer orders that have been sent from this store to you and have not been received.
- Select the transfer order and open it.
- You can edit the lines of the transfer order if you did not receive the same quantity as the sending store stated.
- You can save the transfer order at any time and continue working with it later on.
- When you are finished updating the transfer order receiving quantities you press the SEND button to update the on-hand inventory of the items and close the transfer order.
| Inserted: | December 2019 |
| Version: | LS One 2019.1 |

