Customers View
Retail > Customers > Customers
What is the view used for?
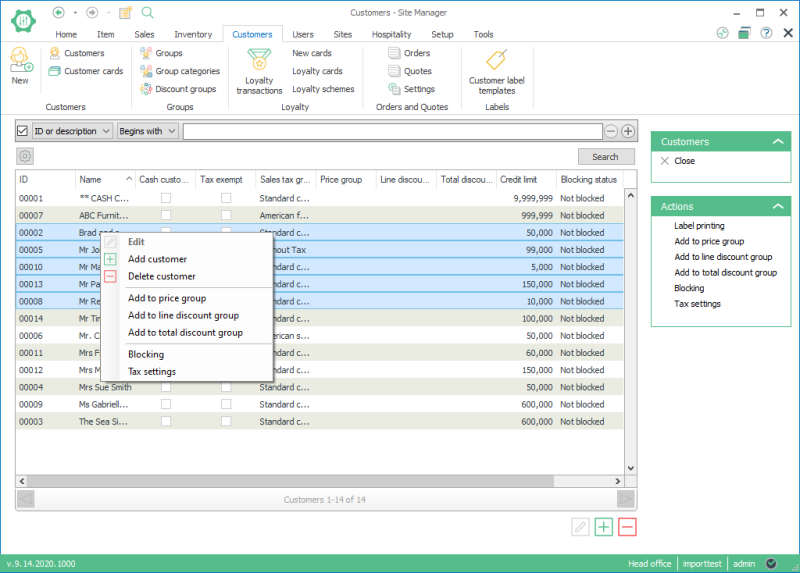
- View all of the customers available.
- Search for groups, and individual customers using the search filter.
- Edit a customer
- Add customers to groups
- Set blocking status for customer
- Scroll the customer pages with the forward/back buttons.
Note:
You can choose which column the customers are ordered by, by clicking on the column header, it will automatically choose an upwards pointing arrow that orders 0-10 and A-Z, reverse the order by clicking again and making sure that the green arrow points downwards.
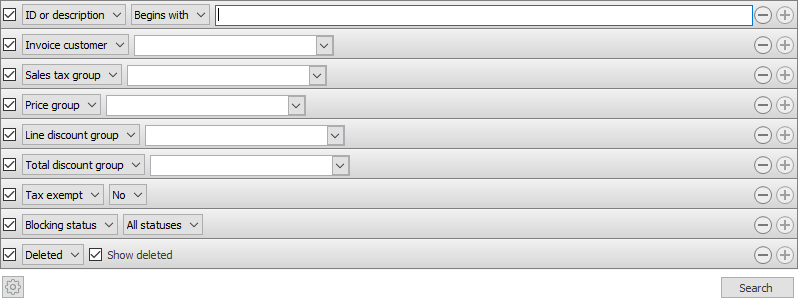
Customers can be searched in a filtered search. One filtering line is added for each type of filter. You can even save your preferred filtering settings and they will be available when you open the Customer view.
| Fields & buttons | Description |
|---|---|
|
Select a filter type for each search filter line Check the box to use the search criteria Search can be filtered on customers having blocking status as blocked, limited to invoices, not blocked or all
|
|
This field is only visible for types that allow free text search. That is ID and description. |
| Search field | Enter the search criteria. For ID or description you can enter a free text but for all the other types you select one group, blocked or such. |

|
If there are more than one lines press this button to delete a search criteria. You can also unselect the check box to exclude a criteria from the search. |

|
Press this button to add search criteria |

|
The following actions are available from a drop down menu when this button is pressed.
|
|
Button: |
Press this button or hit enter button on keyboard to search for a customer with the filters set. |
| Fields & buttons | Description |
|---|---|
| ID | Displays the customer ID |
| Name | Displays the customer description |
| Cash customer | Displays whether customer is a cash customer or not |
| Sales tax group | Displays the customer sales tax group |
| Price group | Displays the customer price group |
| Line discount group | Displays the customer line discount group |
| Total discount group | Displays the customer total discount group |
| Credit limit | Displays the customers credit limit |
| Blocking status | Displays the customer blocking status |

|
Select this button to scroll back through the list of customers. This button is only enabled if there exist more than 500 customers |

|
Select this button to scroll forwards through the list of customers. This button is only enabled if there exist more than 500 customers |
 Edit Edit |
Highlight a customer line on the list and click on this button to edit the customer. Opens the Customer ID View. |
 Add Add |
Click on this button to add a new customer. Opens the New customer dialog. |
 Delete Delete |
Highlight a customer line on the list and click on this button to delete the customer. Note: If the customer belongs to any transaction or has any entries in Customer ledger, the system won't allow to delete it. It will be offered to block the customer instead. 
All customers can be deleted as nothing is actually deleted from the data. Customers are only marked as deleted and can be recovered. To recover a customer select the attribute search filter and select Show deleted. All deleted customers will then be displayed in the search results and you are able to undelete them by using the Delete button. |
| Link: Label printing | Click on this link to open Label printing dialog. |
- Label printing
- Click on this link to open Label printing dialog.
- Add to price group -
- Highlight a customer(s) line(s) and select this button to add customer(s) to price group
- Add to line discount group -
- Highlight a customer line and select this button add customer to line discount group
- Add to total discount group -
- Highlight a customer line and select this button to add customer to total discount group
- Blocking -
- Highlight a customer line and select this button to set blocking status for customer
- Highlight a customer line and select this button to set blocking status for customer
Note:
Some actions and operations are available for multiple items at the same time. Multiple items can be selected by holding down Ctrl or Shift while selecting from the list.
When the lines have been selected the action can be selected from the Actions menu or by right clicking the selection.

See also
| Last updated: | 3rd Feb 2017 |
| Version: | LS One 2017 |


