Request for transfer in the POS
When you need inventory from another store you can create and send a transfer request to that store.
Transfer requests can be created in the Site Manager or the LS One POS
Create a transfer request in the POS
- In your layout you need a POS button with POS operation: Transfer request, parameter: Outgoing. (See how to edit your layout)
In the standard demo data layouts press button Inventory and then button Request transfer - Now the Request transfer dialog is open displaying a list of all open transfer requests your store has created.
- Press the
 add button to create a new transfer request.
 - A dialog opens where you fill in the header information for the request.
- Create options
- Create new - Creates a blank request for you to add the items you need.
- Create from template - Creates a request including the items and settings from the inventory template.
- Create from existing request - Copies the items and settings from an old request.
- Copy from - When creating from template or existing request make your selection here.
- Description - Enter a description for your request. The description is displayed in all lists of requests.
- From store - Select which store to request inventory from.
- Due date - Pick the preferred date to get the items.
- Create options
- Press the Next button to create your request.
- Scan, enter or search for the items you want to add to your transfer request.
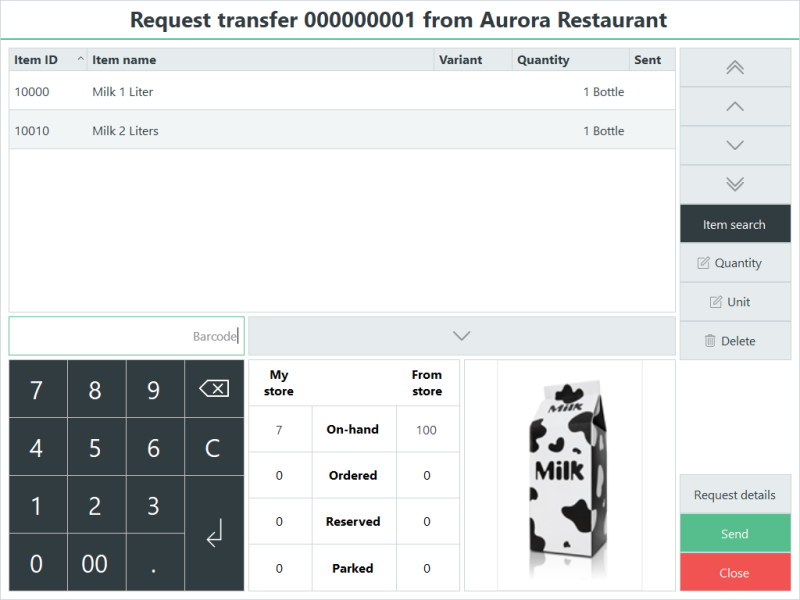
You can edit the quantity and unit of each line. The inventory of the selected item at your location and the location you are requesting for is displayed.
You can go back and edit the request header details by pressing the Request details button. - If you have a long list of items and you want more room to view the list you can collapse the information panel at the bottom by pressing the collaps/expand button.

Press the same button again to expand the information panel. - If you want to save your request to edit and send it off later press the Close button or if you are finished you can send your request. Now your request is available both in the LS One POS and in the Site Manager.
Send a transfer request
- In your layout you need a POS button with POS operation: Transfer request, parameter: Outgoing. (See how to edit your layout)
In the standard demo data layouts press button Inventory and then button Request transfer -
Now the Request transfer dialog is open displaying a list of all open transfer requests for your store.
- Find and select the transfer request to be sent and press Send request.
If needed you can also open the request first by pressing the edit button and pressing the Send button after editing is done.
 - Now your request has been sent and the store you are requesting from can view your request and create transfer orders from it either in the LS One POS or in the Site Manager

After sending it's possible to add and edit the item lines of the request until it has been viewed by the other store.

Next see how you can receive a transfer request and create a transfer order from it.
See also
- How to view inventory in transfer
- How to receive an inventory transfer order
- Store transfer wizard
- Inventory transfer orders/requests view
- How to create an inventory transfer order
| Updated: | June 2020 |
| Version: | LS One 2020 |

